Creating a New Entity Data Model Using VS 2013 to Work with Entity Framework 6.1.3
May 24, 2017
If you use your U2 accounts to access SQL-based applications, then this blog is written for you. Here I’ll discuss Entity Framework, Visual Studio and provide some screen shots and sample code.
Entity Framework 4.0 or 5.0 is part of old Visual Studio (VS) versions. When upgrading to VS 2013 or later versions, it creates a .NET Framework 4.5 application to work with the newer Entity Framework 6.1.x version. It requires the Manage NuGet Packages tool to install it and it also requires an additional registering process to recognize the Rocket U2 Toolkit driver.
Before you can begin using your U2 accounts in SQL-based applications, you must make the U2 data accessible to those applications. It requires Visual Schema Generator (VSG) to create new sub-table or view schema on UniData accounts. On UniVerse, it needs to run the HS.ADMIN tool to activate a UniVerse account for dynamic normalization or to create a new schema on the account. The HS.SALES and HS.SERVICE accounts have been activated during UniVerse installation by default.
REQUIREMENTS
U2 Toolkit for .NET Developer 2.2.2
U2 Toolkit Developer license
UniVerse 11.1 or UniData 7.3 or later
Visual Studio 2013, 2015, or 2017
Microsoft.NET Framework 4.5 or later
ADO.NET Entity Framework 6.1.x
Preparing U2 accounts using UniData VSG or UniVerse HS.ADMIN tool
Installing U2 Toolkit for .NET Developer and Licensing
The Rocket U2 Toolkit for .NET Developer software cannot be found on the Rocket Product availability web site. You must order the product with the U2 Toolkit Developer license via RBC or your value-added-reseller (VAR). When you install Rocket U2 Toolkit for .NET Developer software, it also installs 32-bit and 64-bit Rocket U2 Toolkit for .NET Provider software.
The software installation and licensing information can be found in the U2 Toolkit manual. The installation setup menu look like the following:
The U2 Toolkit for .NET Developer’s Authorization tool can be found in the Rocket U2 sub folder. You must have a U2 Toolkit developer serial number for authorization from the RBC team. The authorization code can be generated on the Rocket Business Connect web site – https://rbc.rocketsoftware.com/
The U2 Toolkit for .NET Developer’s Authorization tool is run as the following output.
Procedure
When you use Visual Studio 2013 to create a new C# application, it will use a target .NET Framework 4.5. On newer VS 2015 and VS 2017, it generates a .NET Framework 4.6 application by default that needs a different U2 Toolkit 4.6 driver to work with. This blog provides simple steps to create a C# console program on a VS 2013 environment.
1. Open a project in Visual Studio. This project was created in Visual Studio 2013.
2. Select the programming language you want to work in. The examples in this document are all created using C#.
3. Select File > New Project.
4. When the New Project dialog box opens, select Windows / Console Application.
5. In the name field, enter a name for the project. The project name in this example is ConsoleApplication1.
6. In the location field, enter the location where the project will reside. The location in this example is C:\temp.
7. Click OK. It will create a .NET Framework 4.5 application by default.
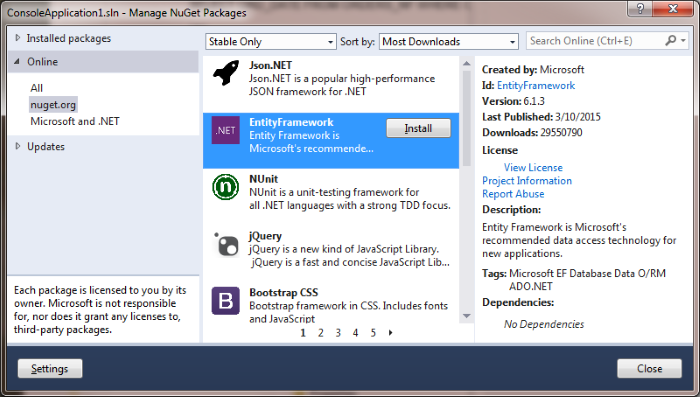
- Starting with Entity Framework 6.1.3, this version will ship independently from Microsoft Visual Studio software. In Visual Studio 2013, you must have the Manage NuGet Packages tool from the TOOLS menu of the VS C# project or you can’t select the Entity Framework 6.1.3 package (using the Manage Nuget Packages). New Entity Framework information will be added to the App.config file.
 9. Add a new Class object to the project and put the “Customer.cs” in the Name field and update Customer.cs file with the sample code.
Note: You must add the CustomerContext connection string with U2 server credential information in the app.config configuration file.
- Update the App.config file for the CutomerContext connection string to find the Customer entity. In the connection string, it needs to specify the provider name as “U2.Data.Client.4.5”; you need to define the entry in the providers list.
Note: For the U2.Data.Client.Entity 4.6 driver, the PublicKeyToken is “7f1dc11a3fe611eb”. You can use the VS 2013 x86 native sn command with “-T” option to find the public token information.
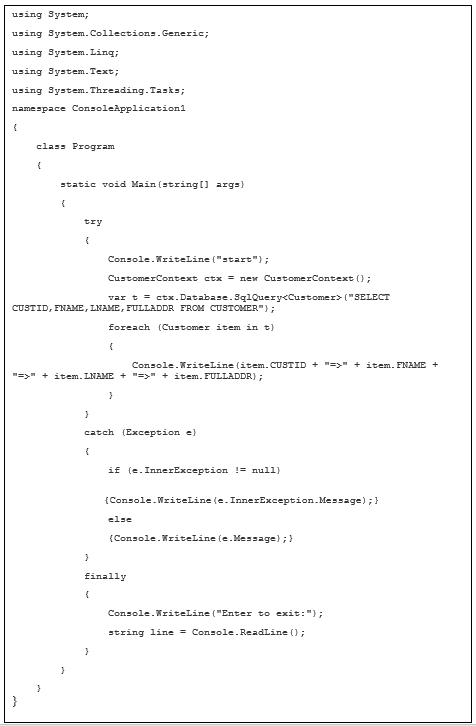
11. Add the SqlQuery statement to the Customer entity to the Program.cs file.
Console application result
The sample program should return the entity query as the following output.


