An Experienced MultiValue User and Developer Shares His Experience and Thoughts on the New Rocket MultiValue Integration Server (MVIS)
November 6, 2019
I should start off by introducing myself: my name is Mark Sapp and I’m a Senior Software Engineer at Rocket Software. My focus is on the development of the Rocket Business Connect system (aka RBC).
Recently, I’ve been working on upgrading our RBC application (which runs on UniData, System Builder and Web DE). During this project, I’ve had the pleasure of learning about and working with our new product, MVIS. I speak from experience when I say that MVIS is easy to use with a short learning curve. I am very excited to continue to use the product for our future development.
MultiValue data, modern tools and industry standards
If you read nothing else, read this: MVIS has incredible potential! You can do so many things right out of the box. One example: MVIS can read a data dictionary directly from UniVerse and UniData and utilize the MultiValue data to create an application. MVIS utilizes REST, which is a widespread standard used in the creation of APIs, for internet services that are fast and efficient. (For more detail on web application and mobile app development using MVIS, see previous blog posts by Andrew Gorovoy. As a summer intern with no experience with MultiValue data, Andrew demonstrated how quickly he could travel the MVIS learning curve using modern development tools.)
I see this as a modern design tool that leaves behind the bulky application model that required you to keep track of lots of information; such as session variables and cookies. Instead, this allows for a new paradigm where each click is a “microservice” providing a dedicated function, such as a button on a mobile app. I see it as many small nimble routines versus a single large monolithic program with thousands of lines of code.
MVIS also magically converts data to JSON data format, which is an industry standard that seems to be made for MultiValue data. By using MVIS, you can easily pass data to other architectures and UI tools, such as Java Script or other open-source development environments. Said in a different way, MVIS lets you easily utilize the output of existing subroutines, written in BASIC, to modern tools.
Leveraging legacy with a modern API
I have focused on creating MVIS subroutine resources and building dynamic arrays using the power of BASIC on the backend. It’s as easy as building a subroutine (or using existing code) that uses the subroutine parameters to encapsulate the input and output data passed between MVIS and the back-end server. MVIS will then do the heavy lifting to handle the array (or record). By heavy lifting, I mean you make entries to define the resource and dynamic arrays, then MVIS handles the complex nesting of the single, MultiValue and subvalue associated relationships; including parsing to/from JSON format. In many cases, I’ve been able to leverage existing code and quickly create a new REST service.
Built for the future
The last step is deciding where you want the data to go. The possibilities are many with the wide acceptance of REST services and JSON to create web and mobile apps using modern technology like angular or node.js.
However, it’s not just for internet. As more architectures share data between dedicated applications, you may be able to leverage the efficiency and speed of REST/JSON to share data with other systems instead of creating SQL schemas, SOAP/XML services, or other less-efficient exchange methods.
MVIS provides a full stack solution and enhances the user experience. It is designed to work with industry standards now and in the future.
MVIS REST application examples
The following brief examples will demonstrate the ability to quickly create a subroutine resource completely in MVIS. We assume that you have already installed the product and configured your server connection and accounts. (Please refer to the MVIS documentation for full details on installation and setup.)
Example 1
We will be creating the service REST.HELLO.WORLD
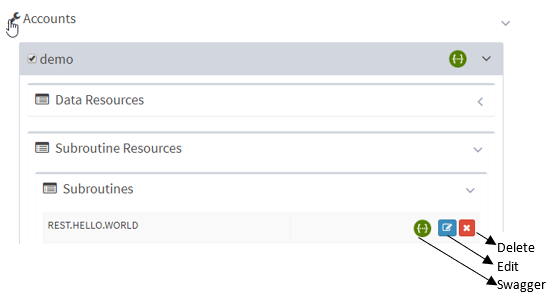
We start in the REST Server configuration -> Accounts -> your account name -> Subroutine resources -> Add subroutine.
Subroutine code can be written either on the MVIS server or on the backend data server. Click on the button +Add Subroutine to begin.
Step 1 – Click on the write icon and define the service.
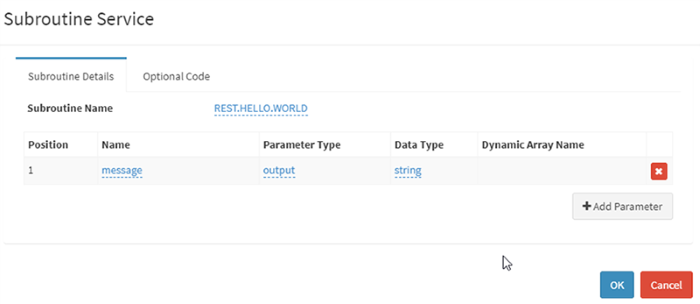
Step 2 – Define subroutine name, parameters, type (input or output) and data type (string, JSON or dynamic array)
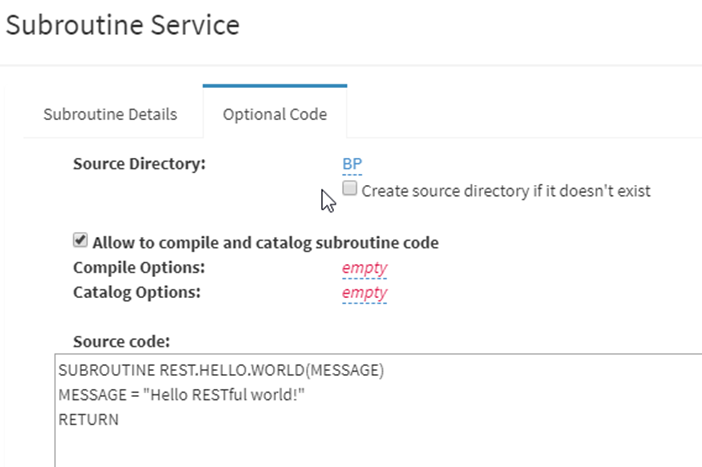
Step 3 – Optional Code tab – code can be entered here. This could be used for smaller routines, although code is being stored and called from the backend data server.
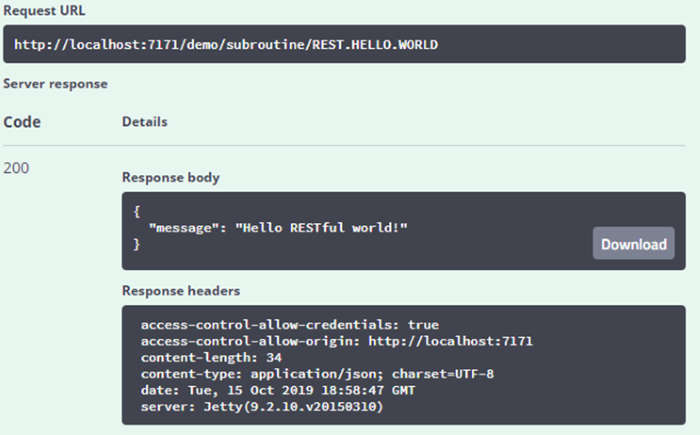
Step 4. Test with Swagger – an open source tool bundled with MVIS that provides the ability to test and document your REST services.
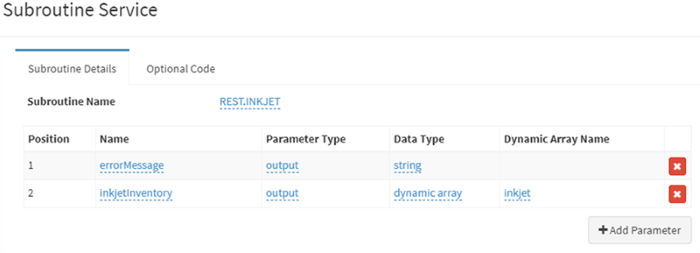
Example 2
In this example, there is no input – imagine this is part of a drill-down that responds to the choice of “Ink Jet Printers” to display inventory. There are two output parameters, errorMessage and inkjetInventory that contains the data. Note that it is defined as a dynamic array.
Step 1 – Define the subroutine resource
Step 2 – Write the BASIC code

Note: This can be done in advance of creating the REST service and can be tested on the server by creating a small wrapper program to call and pass the parameters to the subroutine and display the results.
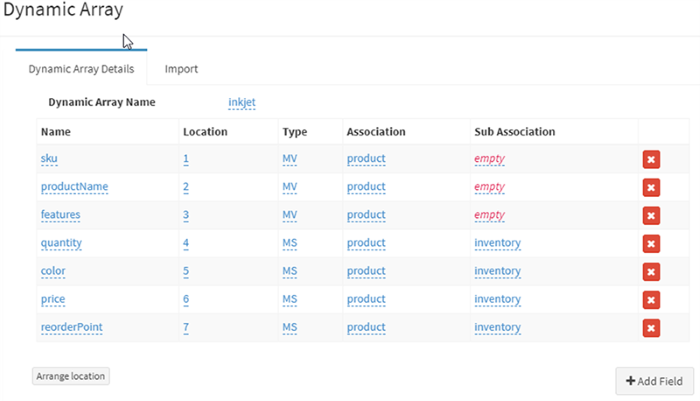
Step 3 – Define the dynamic array. In this example, note we are using associated multivalues and subvalues. This is where we define the information that has been passed back from the subroutine and tell MVIS how to format the output.
You can download a free trial of MVIS from our website. And to help you get started, watch a series of short how-to videos:
Setting up and configuring MVIS
Viewing and Exercising Swagger Definitions
Creating an account and a connection pool
Adding security at the user level


