Business Intelligence Development Studio (SSIS) and U2 toolkit for .NET V.2.2.2 with a Native Connection
June 6, 2018
Overview
Microsoft SQL Server Integration Services (SSIS) is a platform for building high performance data integration solutions, including extraction, transformation, and load (ETL) packages for data warehousing. It can transfer UniData or UniVerse data to SQL Server very easily. If you use a uci connection to access a UniData or UniVerse server, you must normalize your account first with proper schema and permission settings. The U2 Toolkit client also provides a native connection option that does not require normalization. However, the result data set is very different from a uci connection. The users might need to make some adjustment for SQL Server tables.
In this blog post, you will learn how to use Visual Studio (VS) 2017 SSIS Designer using .NET Framework 4.6 to create a simple Microsoft SQL Server Integration Services package. The sample package will export UniData file data into a SQL Server table using a native connection.
Note
You need to register your U2 Toolkit for .NET driver with VS 2017. If you do not find U2 Toolkit for .NET Provider 4.6 in the .NET Providers list, you need to reinstall the 32-bit and 64-bit U2 Toolkit providers or use the gacutil tool to register the driver.
In the VS 2017 Configure ADO.NET Connection manager, the U2 Toolkit driver should be on the list.

When using the “gacutil /l U2.Data.Client” command in the VS Developer Command Prompt, it should see eight (8) U2.Data.Client list in the Global Assembly Cache.

Requirements
| Rocket MultiValue Application Platform | Version |
| UniData | 7.3 or later |
| UniVerse | 11.2 or later |
| Microsoft | Version |
| Visual Studio 2017
Professional or Enterprise |
15.6.6 |
| SQL Server Data Tools
(SSDT-Setup-ENU.exe) |
14.0.16162.0 |
| SQL Server | 2014 or higher |
Create a SQL Server Integration Services (SSIS) Package
Create an SSIS package based on the U2 database (in this blog post I’m using the UniData/demo database) using a U2 Toolkit native connection. In this tutorial, you will learn how to create an SSIS project, set up U2 connection information, define a SQL statement in the command field, create a SQL Server destination table, map the fields, and transfer data to SQL Server.
Step 1: Creating a SQL Server Integration Services Project
First you need to create an SSIS project where you will save your definition (Package.dtsx) file and any other resource files that you need to run the SSIS package.
When you run the SSIS package, the actual UniData data is retrieved and combined with the layout, and then transferred to a SQL Server table. In this lesson, you will learn how to create an SSIS project in the SQL Server Data Tools (SSDT).
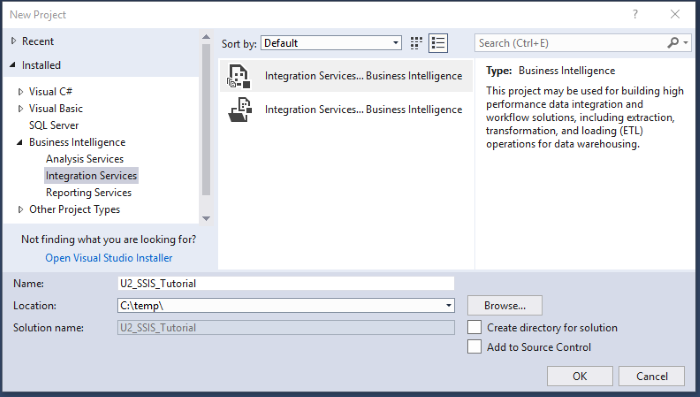
To create an SSIS project
- Start Visual Studio 2017 from program menu or from
“C:\Program Files (x86)\Microsoft Visual Studio\2017\Professional or Enterprise\Common7\IDE\devenv.exe”.
- On the File menu, click New > Project.
- In the Installed Templates list, click Business Intelligence.
- Click Integration Services.
- In the Name field, enter U2_SSIS_Tutorial.
- Click OK to create the project.
Step 2: Creating Connection Information to U2 and SQL Server (SSIS)
You need to define an ADO.NET source connection, which accesses UniData data in native mode. You will use the U2 database (UniData/Demo) sample database as your source data. It also needs another ADO.NET destination connection to SQL Server 2016.
In the Connection Managers pane, you can right-click to create a new ADO.NET connection. When clicking on the “New” button, you can choose the “U2 Toolkit for .NET Provider 4.6” from the .Net Providers list…
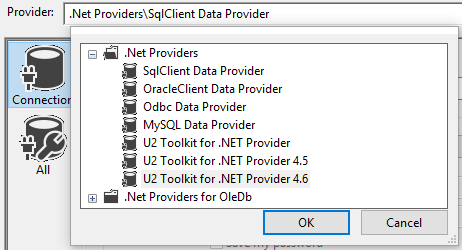
to set up a UniData connection in native mode.
You need to change the AccessMode parameter from “Uci” to “Native” and the RpcServiceType from “defcs” to “udcs” for UniData or “uvcs” for UniVerse.
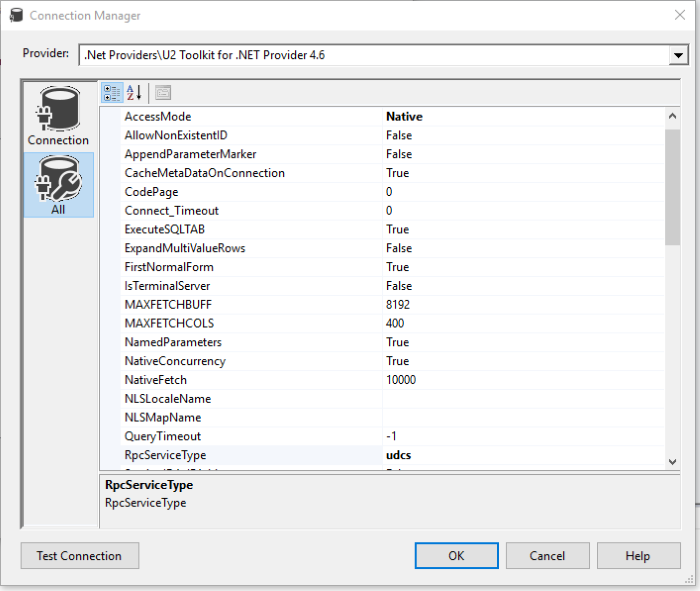
| Parameter | Value |
| AccessMode | Native |
| RpcServiceType | udcs |
| ServerType | UniData |
| Password | ****** |
| UserID | administrator |
| Database | demo |
| Server | localhost |
You should see the “succeeded” message, if you click on the “Test Connection” button.

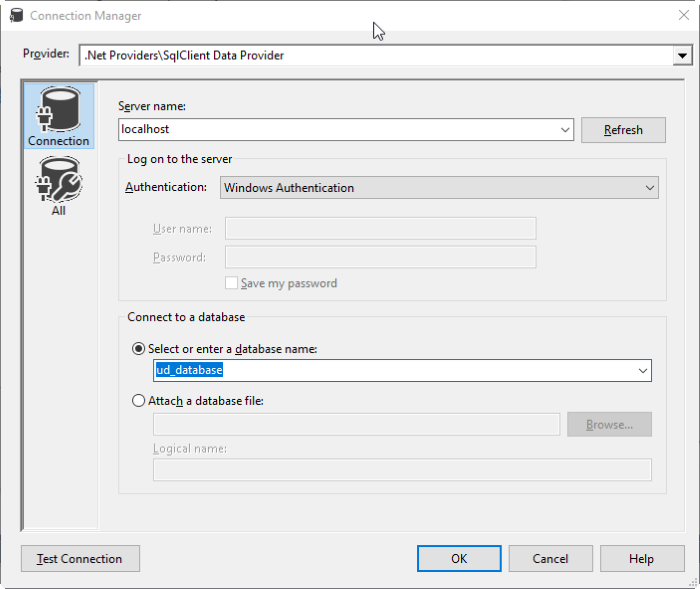
You need to create another SQL Server connection using SqlClient Data Provider.
Step 3: Creating Data Flow Task with AO.NET connections (SSIS)
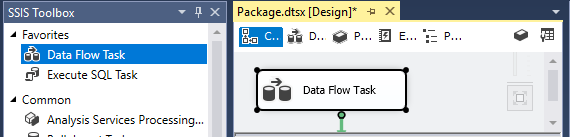
Drag a Data Flow Task to the Package.dtsx design pane.
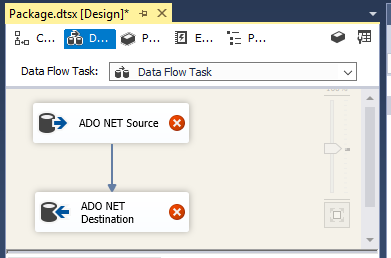
In the Data Flow task, drag an ADO.NET Source and an ADO.NET Destination to the pane, then the ADO.NET source will link to the ADO.NET Destination.
Click on the “ADO NET Source” object to select the “localhost.demo.admin” connection as defined in step 2. In Data access mode, it will be set to “SQL command”; next input the “SELECT * FROM STUDENT” SQL statement in the SQL command text field.
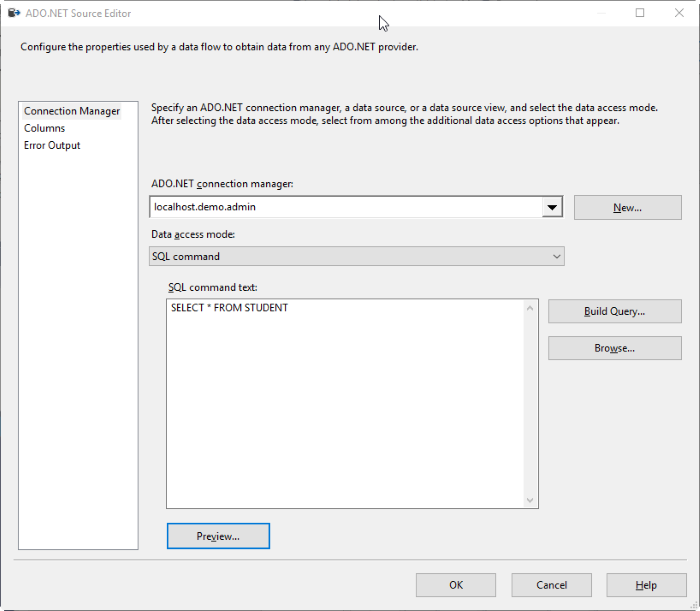
Note: If the file is with some virtual fields, the dictionary must be compiled first.
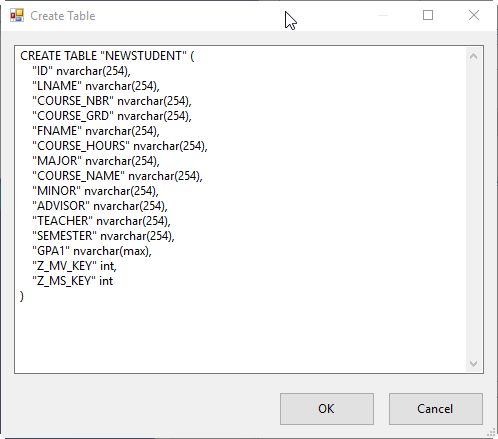
For the “ADO NET Destination” object, you select another “localhost.ud_database” connection as defined in the step 2. It can create a new SQL Server destination table on the second “New” button.
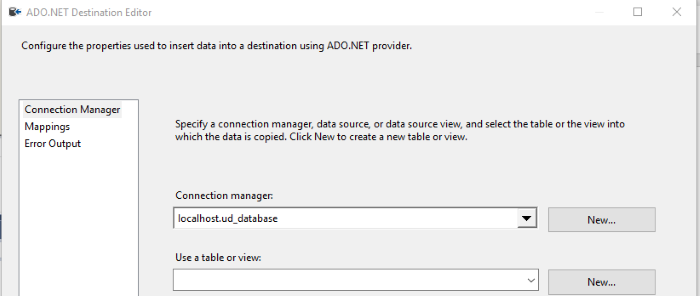
You might modify the table name and some other data type information.
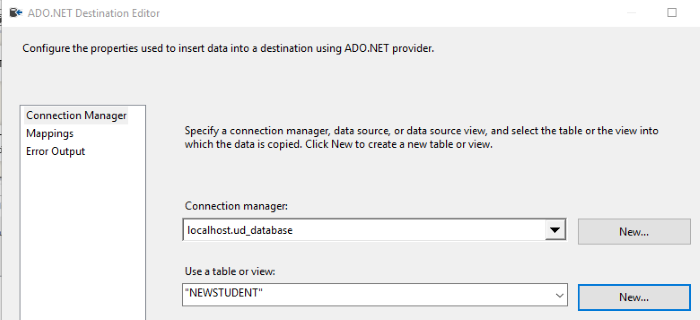
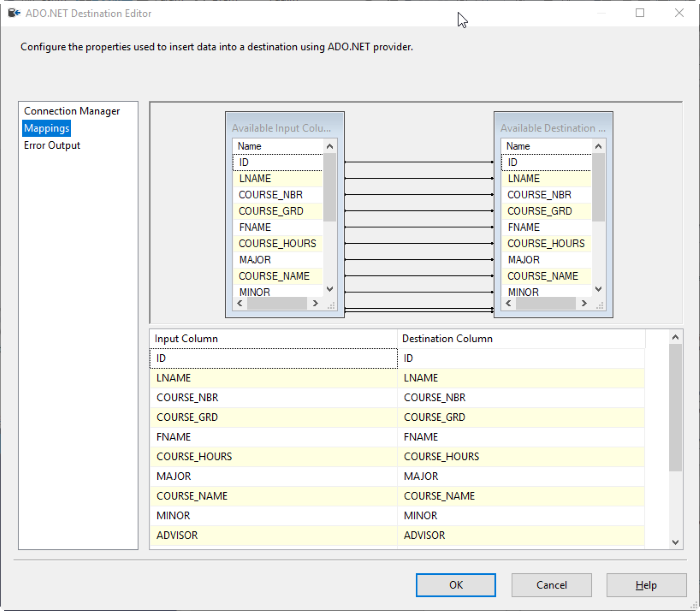
Please click on the “Mappings” option to see the fields mapping.
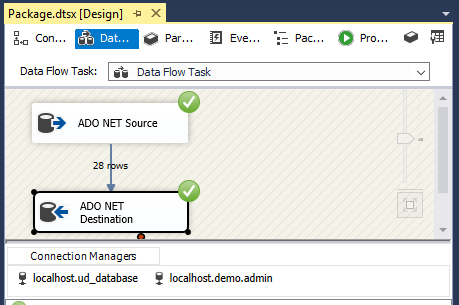
Step 4: Run the package to migrate UniData data to SQL Server (SSIS)
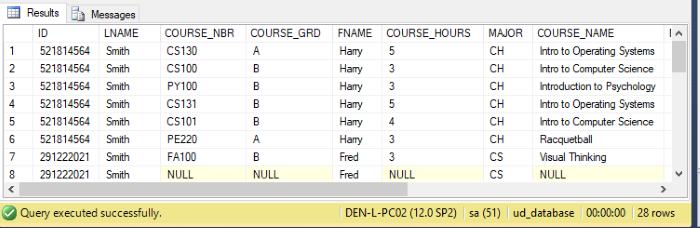
When you run the DTS package, it shows 28 rows to SQL Server based on the original 6 STUDENT records that will expand multi-value and sub-value data to different rows.
Step 5: Verify conversion data on SQL Server (SSIS)
In the SQL Server table, it will generate additional Z_MV_KEY and Z_MS_KEY to identify MV & MS position. The first record is expanded to 6 rows.